

Hello friends, in the previous article you can see “what is the view in android” but in this article, I will tell you how to use that view classes to develop your own android application. Before you see the use of Android view classes you need to know about what is the view in android if you don’t know what is that, then click on this link:- Introduction to Android Views and ViewGroups. After completed that article let’s see the use of that android view classes.

What is View in Android:-
View is basically a building block of UI(User Interface) in android. View refers to the android.view.View class, which is the superclass for all the GUI components.
Here we have some of the most commonly used android View classes:-
- TextView
- EditText
- ImageView
- Button
- ImageButton
- Rediobutton
- CheckBox
so let’s see all the view classes in details one by one.

1. TextView:-
Textview is most used view in android it’s used to show text on your display. For example when you creating a form and you need to label any section then at that time you can use TextView.
There are some attributes that are used in TextView :-Attribute Description android:text Used to specify the text to be displayed in the TextView. android:textColor Using this we can set the color of our text whatever we want. android:textSize Using this attribute we can control the size of the text. android:textAllCaps If this attribute is set True, This will make the text appear in uppercase. android:letterSpacing Using this attribute we can set the spacing between letters of the text.
Now let’s see how to define TextView in your application. Here I give you the XML code of my TextView, So using that you can easily understand.
<TextView
        android:id="@+id/textView1"
        android:layout_width="match_parent"
        android:layout_height="wrap_content"
        android:layout_marginBottom="10dp"
        android:text="Smgplaza.com"
        android:textColor="#86AD33"
        android:textSize="20dp"
        android:textStyle="bold" />
2. EditText:-
EditText is the same as TextView but the only difference is it can be editable. For example, many of you are already fill the many forms online right! So at that, you see the EditText where you need to enter your name that can be editable. So if you want to create that EditText then you can see, below I give the example of EditText.
<EditText
    android:id="@+id/et_address"
    android:layout_width="match_parent"
    android:layout_height="wrap_content"
    android:hint="Write your email Address here"
    android:textSize="20sp"
    android:inputType="textWebEmailAddress"
    android:imeOptions="actionDone"
    android:maxLines="3"/>
Following are some attributes that are most commonly used:-Attribute Description android:minLines It provides the view, with a height equivalent to the specified number of lines on the screen. So, if you enter a value 2, then by default the EditText view will be 2 lines tall, even without any text added to it. It will the default height.android:maxLines When we give maxLines value 3, it means that the EditText view field will be 3 lines tall after which it will stop increasing in size as more and more text is added to it, usually a scroll bar is shown when the number of lines exceeds the limit set.android:inputType Used to specify what the text entered should be like and for what purpose it will be used.
Some commonly used constant values for this attribute are:
textPassword – Display the entered text in form of dots or stars.
textUri
textEmailAddress – Using this user will be only entering the email address.
phone – This will present only the numeric keyboard to users.
datetime, etc.android:hint It displays a hint message before anyone types in the EditText. android:maxLength It allows us to specify the maximum number of characters that the user can enter into the field.
3. ImageView:-
ImageView is used to display images in your display or also say to display an image on the UI.
Following are some of the main attributes that are most commonly used:Attribute Description android:src Set the image as the content for this view. android:maxHeight Used to specify a maximum height for this view. android:maxWidth Used to specify a maximum width for this view. android:scaleType Controls how the image should be resized or moved to match the size of the ImageView.
Here we have specified all the possible values for the attribute scaleType which can be used in your app for ImageView:
CENTER: Places the image in center, but does not scale it.
CENTER_CROP: Scales the image uniformly.
CENTER_INSIDE: This will place the image inside the container and the edges of the image will not overlap with that of the container, the image will be inside it.
FIT_CENTER: Scale the image from the center.
FIT_END: Scale the image from the end of the container, i.e from the right hand side.
FIT_START: Scale the image from the start of the container, i.e from the left hand side.
FIT_XY: This will fill the complete container with the image. This generally distorts the image by stretching/sqeezing it in disproportionate ratios.
MATRIX: Used to scale the image using the image matrix when drawing.android:tint Tints the color of the image in the ImageView.
Following is the code which we need to add into the layout XML file to add an ImageView to our app screen.
<ImageView
    android:id="@+id/smgplaza"
    android:layout_width="match_parent"
    android:layout_height="wrap_content"
    android:scaleType="fitCenter"
    android:src="@drawable/Smgplaza"/>
4. ImageButton:-
ImageButton has the same as ImageView. One feature is extra which is, images set through ImageButton are clickable, and actions can be attached with them upon clicking.
Following is the code which we need to add into the layout XML file to add an ImageeButton to our app screen.
<ImageButton
    android:id="@+id/Smgplaza"
    android:layout_width="match_parent"
    android:layout_height="wrap_content"
    android:scaleType="fitCenter"
    android:src="@drawable/Smgplaza"/>
5. RadioButton:-
RadioButton is used when you have to select only one option among the list of other options. It is used under the RadioGroup parent view so that you can get one selected item out of all other options.
Here is the XML code to create RadioButton in your application :
<RadioGroup
    android:id="@+id/rg_gender"
    android:layout_width="match_parent"
    android:layout_height="wrap_content"
    android:layout_marginTop="10dp"
    android:layout_marginLeft="20dp">

    <RadioButton
        android:id="@+id/rb_male"
        android:layout_width="wrap_content"
        android:layout_height="wrap_content"
        android:text="Male"
        android:textColor="@android:color/black"/>

    <RadioButton
        android:id="@+id/rb_female"
        android:layout_width="wrap_content"
        android:layout_height="wrap_content"
        android:textColor="@android:color/black"
        android:text="Female"/>

</RadioGroup>
6. CheckBox:-
CheckBox is used when you have to select multiple option among the listed option as you want, by simple click on them.
Below is the code to create checkbox for your application :
<CheckBox
    android:id="@+id/myCheckbox"
    android:layout_width="wrap_content"
    android:layout_height="wrap_content"
    android:text="Studytonight"
    android:checked="true"
    android:textColor="@android:color/black"
    android:layout_marginLeft="30dp"/>
Here “android: checked” attribute is used to place the tick mark in the checkbox by default.
7. Button:-
You already know what is the meaning of this view by its name right! It is used to create a click event means if the user wants to perform an action on click of the button then this view is used. It has the same properties as a TextView.
<Button
    android:id="@+id/btn_submit"
    android:layout_width="match_parent"
    android:layout_height="wrap_content"
    android:text="Submit"
    android:textColor="@android:color/holo_blue_dark"
    />;
Now you say ……

So yeah, I give you the code that includes all the views and also I give you the output of that code for better understanding.
<?xml version="1.0" encoding="utf-8"?>
<LinearLayout
    xmlns:android="http://schemas.android.com/apk/res/android"
    xmlns:tools="http://schemas.android.com/tools"
    xmlns:app="http://schemas.android.com/apk/res-auto"
    android:layout_width="match_parent"
    android:layout_height="match_parent"
    tools:context=".MainActivity"
    android:orientation="vertical">

    <TextView
        android:layout_width="wrap_content"
        android:layout_height="wrap_content"
        android:text="Hello World!"
        android:gravity="center"
        android:textSize="20dp"
        android:layout_marginTop="20dp"
        android:layout_gravity="center_horizontal"/>


    <EditText
        android:id="@+id/et_address"
        android:layout_width="match_parent"
        android:layout_height="wrap_content"
        android:layout_margin="20dp"
        android:hint="Write your email Address here"
        android:imeOptions="actionDone"
        android:inputType="textWebEmailAddress"
        android:maxLines="3"
        android:textSize="20sp" />

    <ImageView
        android:id="@+id/smgplaza"
        android:layout_width="match_parent"
        android:layout_height="112dp"
        android:layout_margin="20dp"
        android:scaleType="fitCenter"
        android:src="@drawable/smgplaza" />

    <ImageButton
        android:id="@+id/Smgplaza"
        android:layout_width="match_parent"
        android:layout_height="104dp"
        android:layout_margin="20dp"
        android:scaleType="fitXY"
        android:src="@drawable/smgplaza2" />

    <RadioGroup
        android:id="@+id/rg_gender"
        android:layout_width="match_parent"
        android:layout_height="wrap_content"
        android:layout_marginTop="20dp"
        android:layout_marginLeft="20dp">

        <RadioButton
            android:id="@+id/rb_male"
            android:layout_width="wrap_content"
            android:layout_height="wrap_content"
            android:text="Male"
            android:textColor="@android:color/black"/>

        <RadioButton
            android:id="@+id/rb_female"
            android:layout_width="wrap_content"
            android:layout_height="wrap_content"
            android:textColor="@android:color/black"
            android:text="Female"/>

    </RadioGroup>
    <CheckBox
        android:id="@+id/myCheckbox"
        android:layout_width="wrap_content"
        android:layout_height="wrap_content"
        android:text="Studytonight"
        android:checked="true"
        android:layout_margin="20dp"
        android:textColor="@android:color/black"
        android:layout_marginLeft="30dp"/>

</LinearLayout>
Output:-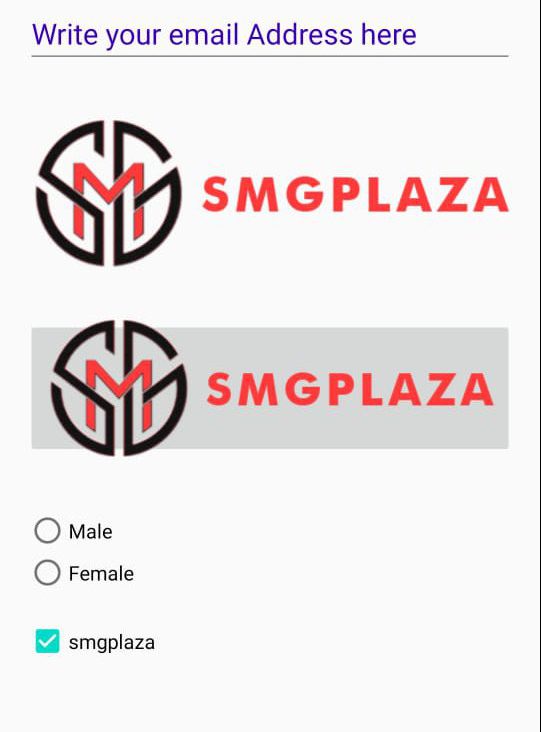
If you have any problem to understand this code then comment me on below comment box and also you can contact me on instagram and facebook.
Other Articles:-
- Introduction to Android Views and ViewGroups.
- Introduction to Python variables.
- Data Type, Numbers, And Casting In Python.
If you like this article then keep visiting smgplaza. I give you the best articles, that can be really useful to learn application development. Thank you for your love and support.


